Newborn photos are a family keepsake. Photographers who specialize in capturing this precious time in a newborns life are beyond talented. They rely on trending photo props and soft textures are so appealing and trendy right now. My latest crochet pattern, the cabled bucket wrap, has all those features.
The bucket wrap is designed to simply tie around a bucket. No need for the photographer to search high and low for the perfect side of bucket to nestle the baby in. Instead wrap it around your favorite one for a whole new look.


Making the Cable Bucket Wrap
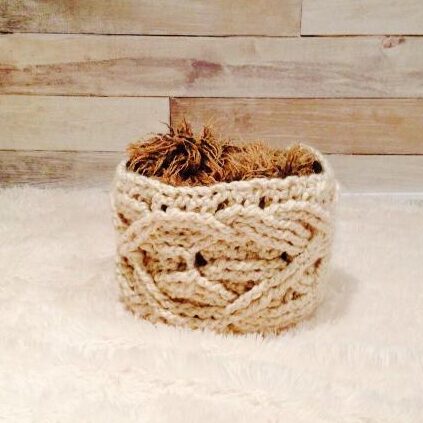
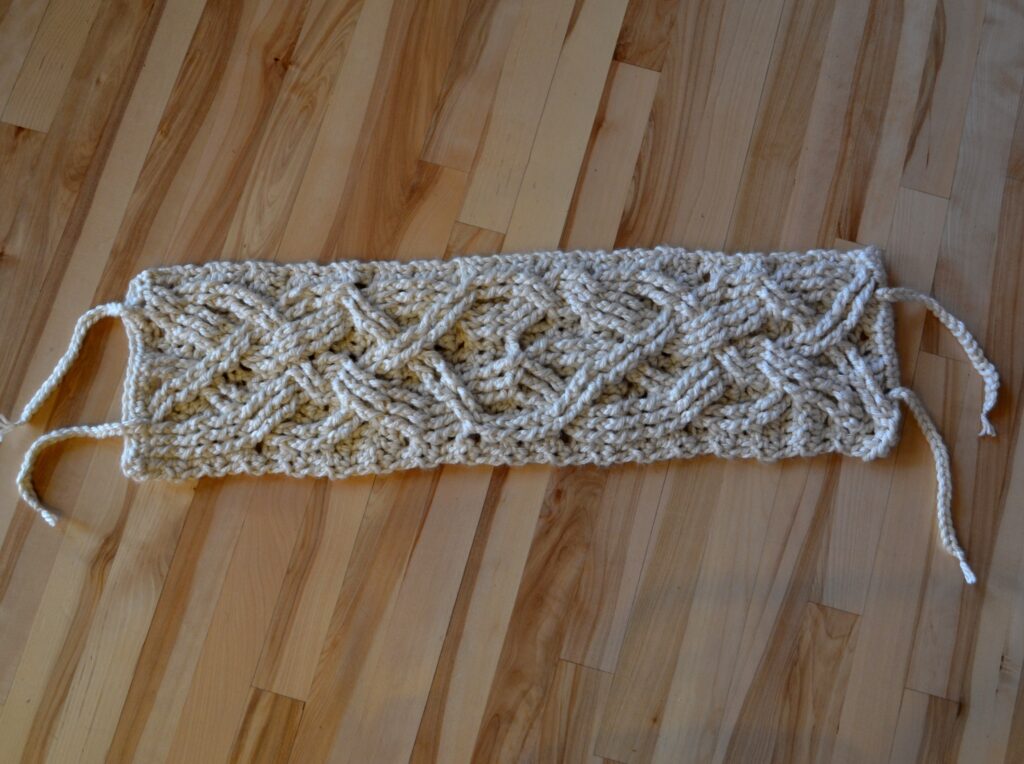
The luxurious cables intertwine using a super bulky yarn, so it works up quick and creates the rich texture in no time at all. The wrap is made as a flat wrap that ties around the bucket allowing flexibility in used. The bucket in the image shown above is about 9″ tall and 11″ across the top opening.
Materials needed to make the Cable Bucket Wrap:
- Crochet Hook size P (10 mm)
- Super Bulky Weight Yarn ~ about 185 yards / Sample was made using Lion Brand in Houston Cream
- Scissors
- X-Large Yarn Needle or smaller crochet hook to weave in ends
Stitches & Abbreviations Used in the Pattern
- Ch = Chain
- Hdc = Half Double Crochet
- Dc = Double Crochet
- Tc = Treble Crochet
- FP = Front Post
- BP = Back Post
Size Gauge:
- Please check gauge for appropriate sizing, change hook to correct size to obtain gauge.
- With Hook P: 5 rows with 8 hdc = 4 ½” wide X 4” tall
Finished Cable Bucket Wrap Size:
Bucket Wrap will be 9” tall and 33” long (made to fit a 9” tall X 11” across bucket)
Pattern Notes:
- The wrap is made to fit most buckets. It’s tie in the back allows it to fit buckets that may vary slightly in size or be larger on the top or bottom.
- The beginning chain always counts as a stitch.
- Due to the nature of crocheting cables, each stitch needs to be a different length to result in an even row. Rows will have a combination of dc & tc stitches.
The Cable Bucket Wrap PATTERN
The pattern for the Cable Bucket Wrap is below. I looks long, but I broke it down in step by step bullet points. Be patient, it is easier than it looks.
Row 1:
Ch 21, hdc in 3rd ch from hook and each remaining ch, turn (20 hdc counting the beginning ch now and for rest of pattern)
Row 2:
- Ch 2, dc in 1st st,
- skip next 4 sts,
- FPtc in each of the next 3 sts,
- working in front of the tc you just completed work a FPtc in each of the first 2 skipped sts,
- working behind all the stitches complete a tc in each of the remaining 2 skipped sts,
- dc in next 2 sts,
- skip next 5 sts, FPtc in next 2 sts,
- working behind the tc you just completed work a FPtc in each of the first 3 skipped sts,
- work a tc in the remaining 2 skipped sts,
- dc in last 2 sts left in the row, turn (20)
Row 3:
- Ch 2, dc in 1st st,
- BPdc in next 3 sts,
- dc in next 2 sts,
- skip next 2 sts, tc in next 2 sts,
- working behind the st you just completed work a BPtc in the 2 skipped sts
- skip next 2 sts, work a BPtc in the next 2 sts,
- working in front of the sts you just completed work a tc in each of the 2 sts you skipped,
- BPdc in next 3 sts,
- dc in last 2 sts left in the row, turn (20)
Row 4:
- Ch 2, dc in 1st st,
- FPdc in next 3 sts,
- dc in next 2 sts,
- skip next 2 sts, FPtc in next 2 sts,
- working in front of the 2 sts you just completed, work a FPtc in the 2 sts you skipped,
- dc in next 2 sts,
- skip next 2 sts, FPtc in next 3 sts,
- working behind the sts you just completed work 2 tc in skipped sts,
- dc in last 2 sts left in the row, turn (20)
Row 5:
- Ch 2, 1 dc in each of the next 3 sts,
- BPdc in next 3 sts,
- dc in next 2 sts,
- BPdc in next 4 sts,
- dc in next 2 sts,
- BPdc in next 3 sts,
- dc in last 2 sts left in row, turn (20)
Row 6:
- Ch 2, dc in 1st st,
- FPdc in next 3 sts,
- skip next 2 sts, FPtc in next 2 sts,
- working behind the sts you just completed work a tc in each of the skipped 2 sts,
- FPdc in next 2 sts,
- skip next 2 sts, FPtc in next 3 sts,
- working behind the sts you just completed work a tc in each of the skipped 2 sts,
- 1 dc in each of the last 4 sts, turn (20)

Row 7:
- Ch 2, dc in 1st st,
- skip next 2 sts, BPtc in next 2 sts (this is the start of a new cable),
- working in front of the stitches you just completed work 1 tc in each of the skipped 2 sts,
- skip next 3 sts, BPtc in next 2 sts,
- working behind the sts you just completed work a BPtc in the 3 skipped sts,
- dc in next 2 sts,
- skip next 2 sts, BPtc in next 3 sts,
- working behind the sts you just completed work a BPtc in the 2 skipped sts,
- dc in each of the last 2 sts, turn (20)
Row 8:
- Ch 2, dc in 1st st,
- FPdc around next 2 sts,
- skip next 3 sts, dc in next 2 sts,
- working in front of the sts you just completed work a FPtc in the 3 skipped sts,
- FPdc in next 5 sts,
- dc in next 2 sts,
- FPdc in next 2 sts,
- dc in each of the last 2 sts, turn (20)
Row 9:
- Ch 2, dc in 1st st,
- BPdc in next 2 sts,
- dc in next 2 sts,
- skip next 2 sts, BPtc in next 3 sts,
- working behind the sts you just completed work a BPtc in the 2 skipped sts,
- BPdc in next 3 sts,
- dc in next 2 sts,
- BPdc in next 2 sts,
- dc in each of the last 2 sts, turn (20)
Row 10:
- Ch 2, dc in 1st st,
- skip next 2 sts, dc in next 2 sts,
- working in front of the sts you just completed work a FPtc in the 2 skipped sts,
- skip next 3 sts, FPtc in next 2 sts,
- working in front of the sts you just completed work a FPtc in the 3 skipped sts,
- skip next 3 sts, tc in next 2 sts,
- working in front of the sts you just completed work a FPtc in the 3 skipped sts,
- FPdc in next 2 sts,
- dc in each of the last 2 sts, turn (20)
Row 11:
- Ch 2, dc in 1st st,
- skip next 2 sts, BPtc in next 3 sts,
- working in front of the sts you just completed work a BPtc in the 2 skipped sts,
- dc in next 2 sts,
- BPdc in next 3 sts,
- skip next 2 sts, BPtc in next 2 sts,
- working behind the sts you just completed work a BPtc in the 2 skipped sts,
- dc in each of the last 4 sts, turn (20)
Row 12:
- Ch 2, dc in 1st st,
- skip next 2 sts, FPtc in next 2 sts,
- working behind the sts you just completed work a tc in the 2 skipped sts,
- skip next 2 sts, FPtc in next 3 sts,
- working in front of the sts you just completed work a FPtc in the 2 skipped sts,
- dc in next 2 sts,
- FPdc in next 5 sts,
- dc in each of the last 2 sts, turn (20)

Row 13:
- Ch 2, dc in 1st st,
- BPdc in next 3 sts,
- skip next 2 sts, tc in next 2 sts,
- working behind the sts you just completed work a BPtc in the 2 skipped sts,
- BPdc in next 5 sts,
- dc in next 2 sts,
- BPdc in next 2 sts,
- dc in each of the last 2 sts, turn (20)
Row 14:
- Ch 2, dc in 1st st,
- FPdc in next 2 sts,
- skip next 2 sts, FPtc in next 3 sts,
- working behind the sts you just completed work a tc in the 2 skipped sts,
- skip next 2 sts, FPtc in next 2 sts,
- working in front of the sts you just completed work a FPtc in the 2 skipped sts,
- dc in next 2 sts,
- FPdc in next 3 sts,
- dc in each of the last 2 sts, turn (20)
Row 15:
- Ch 2, dc in 1st st,
- BPdc in next 3 sts,
- dc in next 2 sts,
- BPdc in next 4 sts,
- dc in next 2 sts,
- BPdc in next 5 sts,
- dc in each of the last 2 sts, turn (20)
Row 16:
- Ch 2, dc in 1st st,
- skip next 2 sts, FPtc in next 3 sts,
- working behind the sts you just completed work a FPtc in the 2 skipped sts,
- dc in next 2 sts,
- FPdc in next 2 sts,
- skip next 2 sts, tc in next 2 sts,
- working in front of the sts you just completed work a FPtc in the 2 skipped sts,
- FPdc in next 3 sts,
- dc in each of the last 2 sts, turn (20)
Row 17:
- Ch 2, dc in 1st st,
- skip next 3 st, BPtc in next 2 sts,
- working in front of the sts you just completed work a BPtc in the 3 skipped sts,
- dc in next 2 sts,
- BPdc in next 2 sts,
- dc in next 2 sts,
- BPdc in next 5 sts,
- dc in each of the last 2 sts, turn (20)
Row 18:
- Ch 2, dc in 1st st,
- skip next 3 sts, FPtc in next 2 sts,
- working behind the sts you just completed work a FPtc in the 3 skipped sts,
- dc in next 2 sts,
- FPdc in next 2 sts,
- skip next 2 sts, FPtc in next 3 sts,
- working behind the sts you just completed work a tc in the 2 skipped sts,
- FPdc in next 2 sts,
- dc in each of the last 2 sts, turn (20)
Row 19:
- Ch 2, dc in 1st st,
- BPdc in next 2 sts,
- dc in next 2 sts,
- skip next 3 sts, BPtc in next 2 sts (this will be the last row of this cable strand),
- working behind the sts you just completed work a BPtc in the 3 skipped sts,
- skip next 2 sts, BPtc in next 3 sts,
- working in front of the sts you just completed work a tc in the 2 skipped sts,
- BPdc in next 2 sts,
- dc in each of the last 2 sts, turn (20)
Row 20:
- Ch 2, dc in 1st st,
- FPdc in next 2 sts,
- dc in next 2 sts,
- FPdc in next 3 sts,
- skip next 3 sts, tc in next 2 sts,
- working in front of the sts you just completed work a FPtc in the 3 skipped sts,
- dc in next 2 sts,
- FPdc in next 2 sts,
- dc in each of the last 2 sts, turn (20)
Row 21:
- Ch 2, dc in 1st st,
- BPdc in next 2 sts,
- dc in next 2 sts,
- BPdc in next 3 sts,
- dc in next 2 sts,
- BPdc in next 3 sts,
- dc in next 2 sts,
- BPdc in next 2 sts,
- dc in each of the last 2 sts, turn (20)
Repeat Rows to finish the cable bucket wrap:
the sections below will be repeats of the above rows.
- Row 22-36: repeat Row 2 – 16
- Row 37: Ch 2, hdc in each st across, fasten off.
- The bucket wrap is simply tied around a bucket. I attached 2 ties on each end of the wrap.
- Joining with a slst around 2 stitches will leave a more stable base for the ties. Slst around the 5th & 6th st from the top of row 36, ch 20 and fasten off.
- Join with a slst around the 5th & 6th st from the bottom of row 36, ch 20 and fasten off.
- Repeat the steps above joining with a slst around the 5th & 6th st from the top (and then the bottom) of row 2, ch 20 and fasten off.
Other Newborn Photo Prop Patterns You May Love

Classic Romper 
Scallop & Cables Bonnet & Wrap 
Triangle Bowl 
Chervron Swaddle Pod
- Classic Romper – Click HERE
- Crown – Click HERE
- Triangle Twist Newborn Bowl – Click HERE
- Chevron Swaddle Pod – Click HERE
- And more Newborn Photo Props – Click HERE