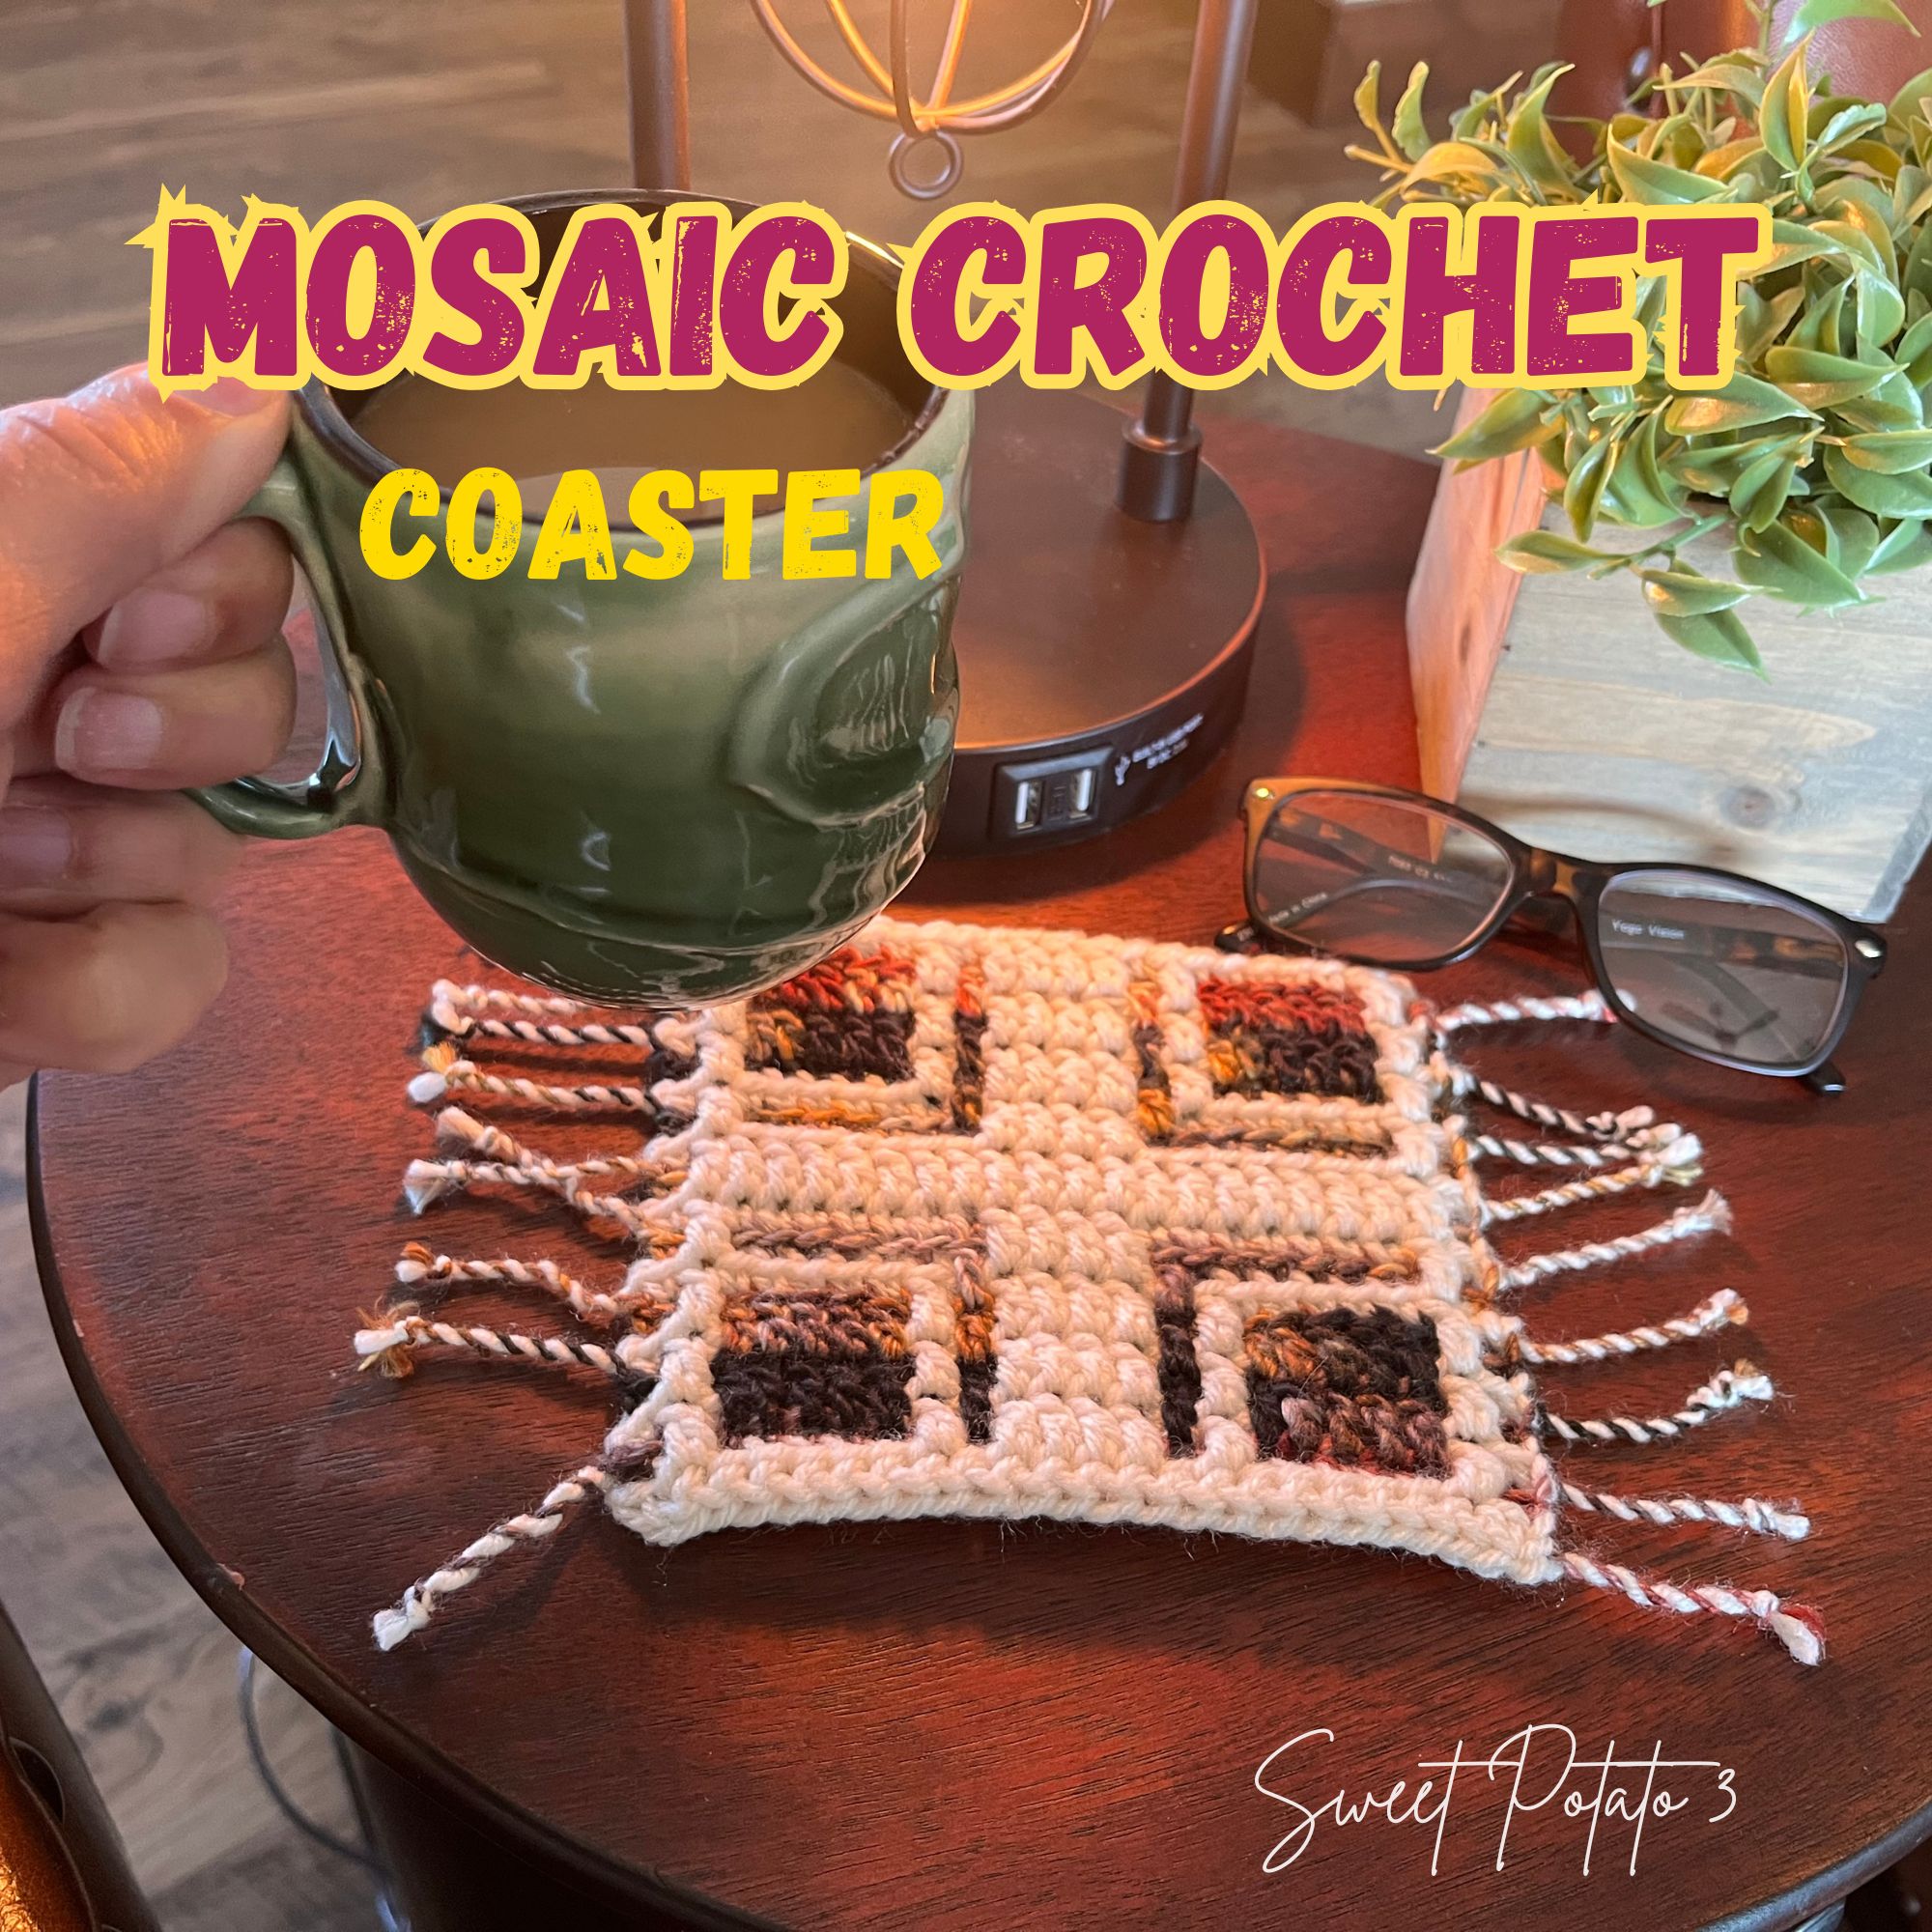
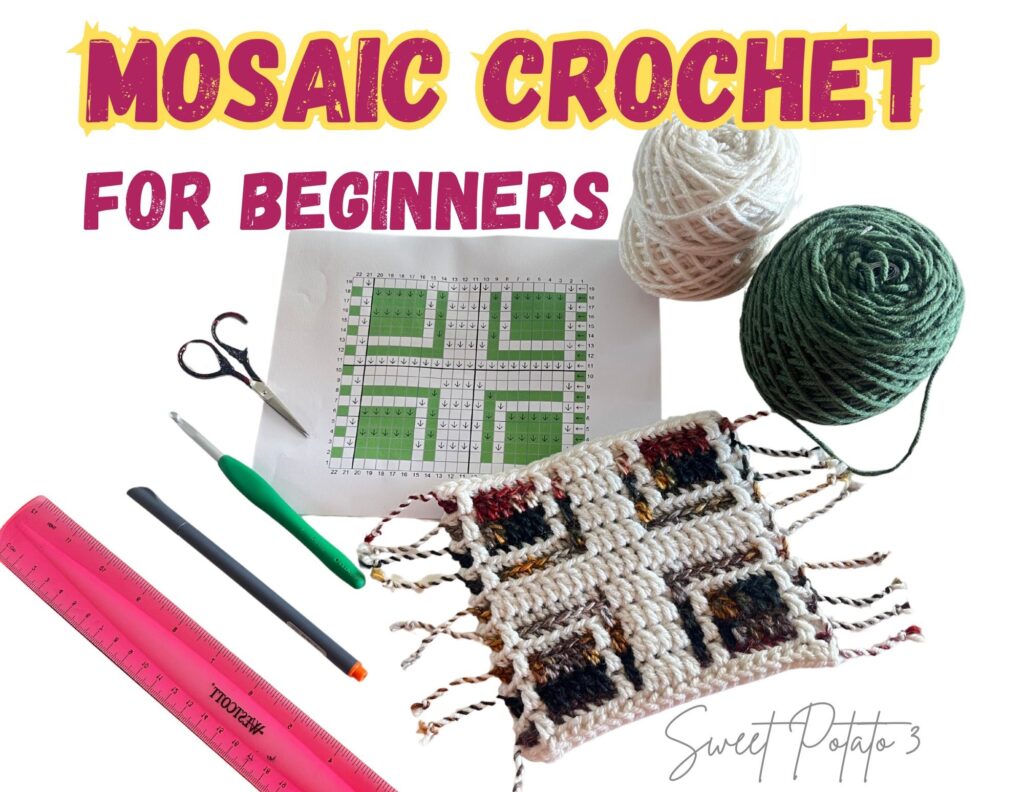
Looking for a beginner-friendly mosaic crochet project? This easy mosaic crochet coaster tutorial is perfect for practicing the overlay mosaic technique while creating a stylish and functional home accessory. With written instructions, a downloadable chart, and a video tutorial, this step-by-step guide will walk you through every stitch!


Mosaic Crochet CoastersSupplies Needed
- Worsted weight yarn in two contrasting colors (Color A and Color B)
- Size H/5.0 mm crochet hook
- Scissors
- Optional: pen/pencil and ruler

Stitches & Terms Used (US Terminology)
- join = when you join your yarn, you will join with a slip stitch which creates a chain, there will not be a beginning chain in the row due to this.
- sc = single crochet
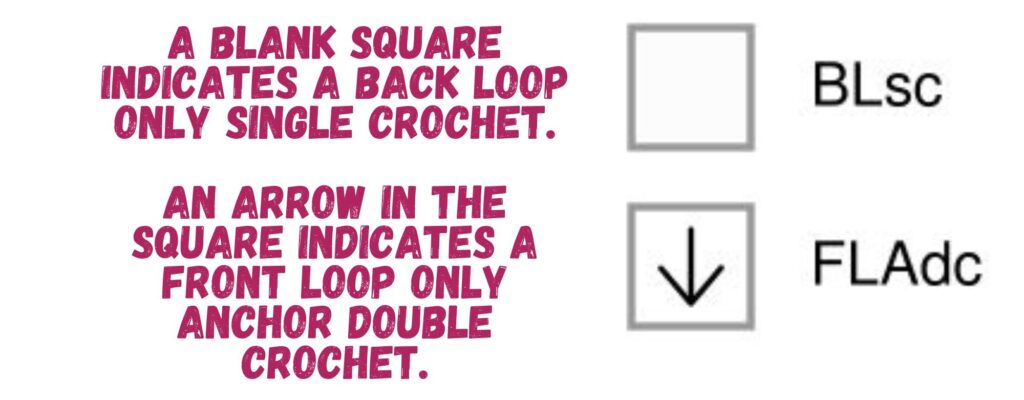
- BLsc = back loop single crochet: indicated by empty square on graph
- FLAdc = front loop anchored double crochet (double crochet worked into the front loop of the stitch from two rows below): indicated by square with down arrow on graph
Each row begins with ch 1, which does not count as a stitch. All rows are worked from the same side (RS), and yarn is cut at the end of each row.
Pattern Notes
- This project uses the overlay mosaic crochet technique: one color per row, all rows worked from the same direction. I have a full tutorial on reading mosaic crochet graphs that you can read or watch by clicking HERE.
- Yarn is cut at the end of every row and restarted at the same edge.
- Choose to finish your yarn tails with fringe, twisted fringe, or a pocket/double border. A full detailed tutorial on these options can be found by clicking HERE.
- Finished size: Approx. 6 inches tall x 5.25 inches wide, not including any fringe, tassels or border.

Download the Free Mosaic Crochet Chart
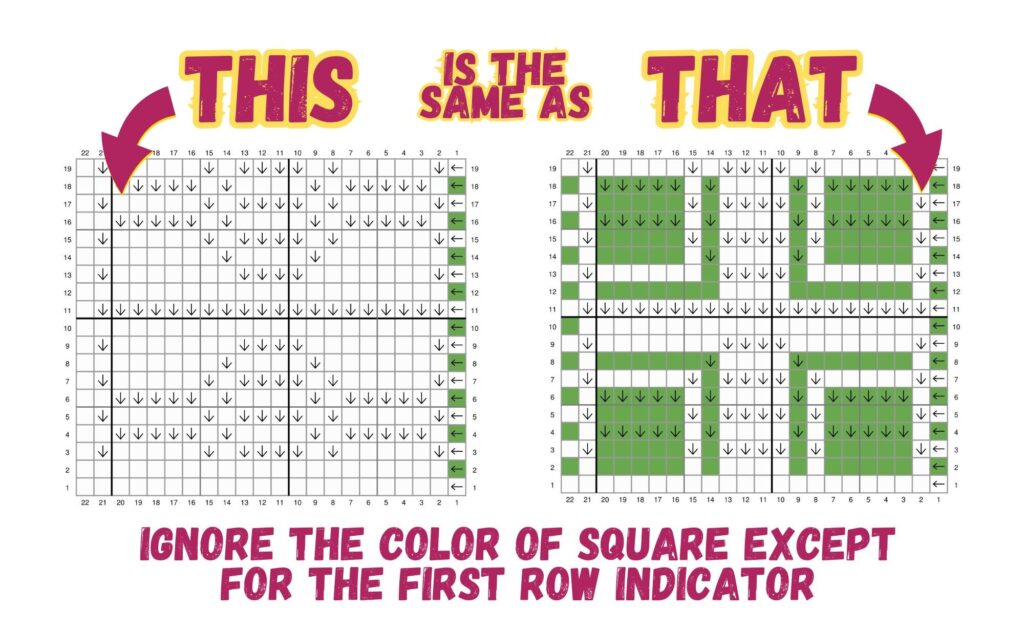
To help visualize the pattern, I’ve included two versions of the chart:
- A color version: this is traditionally how all mosaic crochet graphs are, but if you watched my Mosaic Crochet beginner guide video, you know that the color on the graph does not matter (except for the first stitch). The tutorial in this blog post will use the color version in the row progress photos.
- A plain version that only shows the color on the first stitch of the row. This will allow you to concentrate on the stitch itself instead of the color. I found it helpful to learn on a plain version of a graph until I was more comfortable with the stitches.
👉 Click here to download the FREE mosaic crochet coaster chart
Mosaic Coaster Pattern (Written Instructions)
Row 1 / Foundation: 22 Foundation single crochet, cut yarn
Row 2: join color B, sc, 20BLsc, sc, cut yarn

Row 3: join color A, sc, FLAdc, 5BLsc, FLAdc, BLsc, 4FLAdc, BLsc, FLAdc, 5BLsc, FLAdc, sc, cut yarn
Row 4: join color B, sc, BLsc, 5FLAdc, BLsc, FLAdc, 4BLsc, FLAdc, BLsc, 5FLAdc, BLsc, sc, cut yarn


Notice how the rows seem to change so much between rows. It does not appear to always go with the colors on the graph. Trust the process, though. After each row, the look will change, and once the entire graph is completed, you will see that the full color change pattern will match the graph.
Row 5: join color A, sc, FLAdc, 5BLsc, FLAdc, BLsc, 4FLAdc, BLsc, FLAdc, 5BLsc, FLAdc, sc, cut yarn
Row 6: join color B, sc, BLsc, 5FLAdc, BLsc, FLAdc, 4BLsc, FLAdc, BLsc, 5FLAdc, BLsc, sc, cut yarn


Row 7: join color A, sc, FLAdc, 5BLsc, FLAdc, BLsc, 4FLAdc, BLsc, FLAdc, 5BLsc, FLAdc, sc, cut yarn
Row 8: join color B, sc, 7BLsc, FLAdc, 4BLsc, FLAdc, 7BLsc, sc, cut yarn


Row 9: join color A, sc, FLAdc, 7BLsc, 4FLAdc, 7BLsc, FLAdc, sc, cut yarn
Row 10: join color B, sc, 20BLsc, sc, cut yarn


Row 11: join color A, sc, 20FLAdc, sc, cut yarn
Row 12: join color B, sc, 20BLsc, sc, cut yarn


Row 13: join color A, sc, FLAdc, 7BLsc, 4FLAdc, 7BLsc, FLAdc, sc, cut yarn
Row 14: join color B, sc, 7BLsc, FLAdc, 4BLsc, FLAdc, 7BLsc, sc, cut yarn
Row 15: join color A, sc, FLAdc, 5BLsc, FLAdc, BLsc, 4FLAdc, BLsc, FLAdc, 5BLsc, FLAdc, sc, cut yarn


Row 16: join color B, sc, BLsc, 5FLAdc, BLsc, FLAdc, 4BLsc, FLAdc, BLsc, 5FLAdc, BLsc, sc, cut yarn
Row 17: join color A, sc, FLAdc, 5BLsc, FLAdc, BLsc, 4FLAdc, BLsc, FLAdc, 5BLsc, FLAdc, sc, cut yarn
Row 18: join color B, sc, BLsc, 5FLAdc, BLsc, FLAdc, 4BLsc, FLAdc, BLsc, 5FLAdc, BLsc, sc, cut yarn


Row 19: join color A, sc, FLAdc, 5BLsc, FLAdc, BLsc, 4FLAdc, BLsc, FLAdc, 5BLsc, FLAdc, sc, cut yarn

crochet stitch being placed.
Finishing Options for Yarn Tails
- Simple Fringe: Trim ends to uniform length.
- Twist Fringe: Twist strands together for a decorative effect.
- Weave in Ends: Hide yarn tails with a tapestry needle.
- Crochet Border: Add a single crochet border around the entire coaster for a polished edge.
Best place for image: Side-by-side examples of each finishing technique.

Watch the Video Tutorial
Prefer to watch and follow along? I’ve created a full step-by-step YouTube tutorial for this coaster pattern.
🎥 Watch the Mosaic Coaster Tutorial on YouTube

Tips for Mosaic Crochet Success
- Choose high-contrast yarn colors for the best visual effect.
- Remember to not focus on the color in the graph while crocheting, only note the color of the yarn for each row.
- Keep your tension consistent across rows.
- Practice the anchored double crochet slowly—it’s the magic behind mosaic designs!
- If it is offered, always review both the chart and the written instructions before beginning.
Learn More About Mosaic Crochet
If you enjoyed this pattern, don’t miss my Introduction to Mosaic Crochet guide! It covers everything from reading charts to choosing finishing techniques, with additional project ideas like blankets and pillows.