

My daughter has always had a difficult time getting to sleep at night. We have tried many different routines but when the lights go out, she thinks she will have a bad dream. I was so excited when she came home from school one day and told me one of her friends got a dream catcher and she was sure this would fix her bedtime worries.

This sparked an idea and I knew I had to make one for her the next day. This was such a fun and easy project that literally took an afternoon. I am excited to share this tutorial with all of you today.
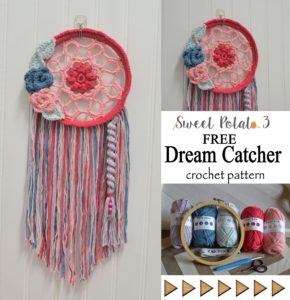
Dream Catchers Delight Tutorial
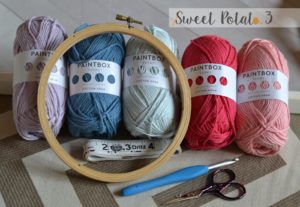
For this pattern I used some beautiful cotton yarn by Paint Box, but any scrap yarn will do. Here is a list of materials needed:
Worsted Weight Scrap Yarn (sample was made from Paintbox Cotton):
Colors used in sample: Lipstick Pink (45 yards), Blush Pink (45 yards), Seafoam Blue (8 yards), Dolphin Blue (12 yards), Dusty Rose (8 yards)
Crochet Hook G (4.5 mm)
Embroider Hoop 6” or 15cm
Scissors & Yarn Needle
Gauge: gauge checks will be given throughout the pattern.
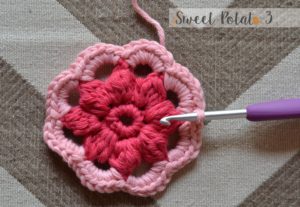
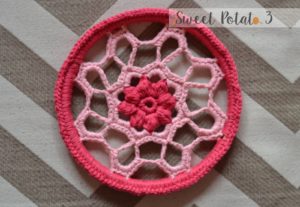
Begin with color 1 (center of dream catcher)
Ch 4, join in 1st ch to form a loop
R1: Ch 1, 8sc in loop, join in fist sc
R2: Ch 2, in same st as join work dc4tog, ch 4, [in next st dc5tog, ch 4], repeat [] to end, fasten off and weave in ends (8 puffs made)
Gauge check: measures 2” across center
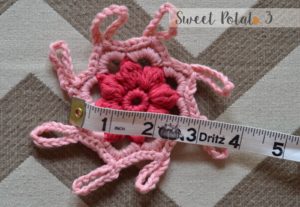
Using color 2, join in any chain loop of R2
R3: Ch 1, 7sc in each ch loop around, join in 1st sc
R4: Slst in next 3 sts (you should be in the 4th sc of the 7sc in the loop), ch 12, slst in same st as last slst, [slst in next 7 sts, ch 12, slst in same st as last slst], repeat [] around, slst in next 3 sts (you should be at the beginning slst), fasten off and weave in ends (8 ch spaces made)
Gauge check; measures 3” across not including the chain loops
Using color 2 (same as last section), join in any chain loop from R4
R5: Ch 1, 10sc in chain loop, ch 2, [10sc in next ch loop, ch 2], repeat [] around, join in top of 1st sc
Gauge check: measures 5” across
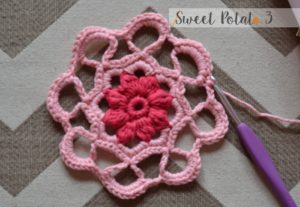
R6: Slst in next 3 sts, [ch 2, skip next 2 sts, slst in next st, ch 6, skip next 8 sts, slst in next st], repeat [] around, join in slst before first ch 2 sp, fasten off and weave in ends
Gauge check: measures just under 6” across (this must be just under 6”, if it is more than 6” then your hoop will be too small, the crochet piece needs to stretch slightly to look nice)
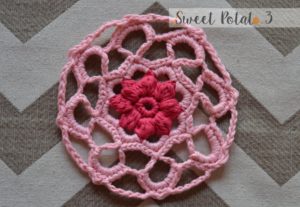
Using color 1
Join into any ch 2 sp but also join around embroidery hoop, in the next round you will be crocheting around the embroidery hoop and in the ch sps from R6
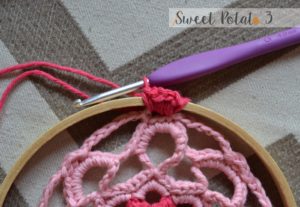
R7: [4sc in ch 2 sp, 12sc in ch 6 sp], repeat [] around,
Note: this row is a bit awkward to crochet, I found it easiest to hold the hoop perpendicular to my body and kind of crochet sideways, but however you can do it, will work.
Almost Done!
Optional: if you feel like the edge (top of sc around hoop) are not clean and even this row will help, turn work and slst in top of each sc from R7, fasten off and weave in ends
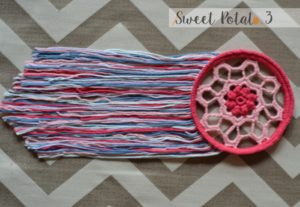
Add the Fringe
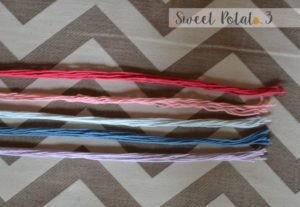
Cut 10 strands of yarn in 5 different colors. Each strand was approximately 28” long.
Fold each strand in half and join at the fold, attach around the yarn wraps around the hoop.
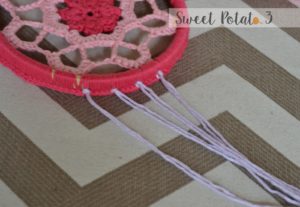
Once all fringe has been attached, comb straight and trim to a “v”.
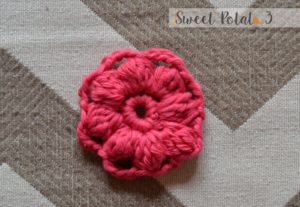
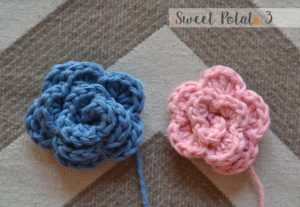
Make 2 Flowers
For the first flower I used Blue yarn and followed this beautiful pattern called the May Rose, link HERE. Take note that this pattern is in UK terms so remember the stitches in US terms are different, the difference is referenced in the pattern.
For the second flower I used pink yarn and followed the same May Rose pattern but only began with a beginning chain of 20. I then worked 3 large petals, 3 medium petals and 3 small petals.
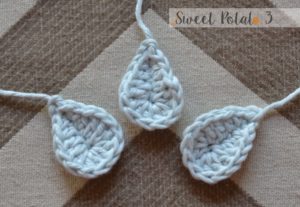
Make 3 Leaves
Ch 6, sl st in 2nd ch from hk. Sc in next ch, hdc in next ch, dc in next ch, 4 dc in next ch, rotate and work along bottom of foundation ch, 4dc in first ch (same ch as last dc made in), dc in next ch, hdc in next ch, sc in next ch, sl st in next, fasten off.
Make Swirled Tassel
Ch 40, sc in 5th ch from hook (the skipped ch 4 will create a loop, this loop will be where you attach the tassel later in the pattern), 2sc in each ch to end, fasten off.
To add tassel at end cut 16 pieces of yarn about 10” long, pull yarn pieces through chain 4 loop at end of tassel and fold in half
Using a contrasting color of yarn, wrap around tassel just below fold. I wrapped around about 4 times and securely tie tight, trim ends of tassel even.
Optional: add a charm and/or beads to tassel

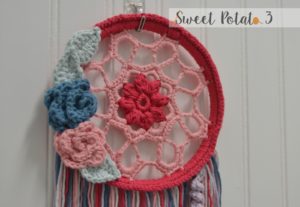
Assembly
Attach blue flower on left side of dream catcher, where the fringe begins.
Sew pink flower just below blue flower.
Sew one leaf to the right of the pink flower, follow the same angle as the hoop,
Sew another leaf about ¾” above the blue flower also following the same angle as the hoop.
Sew last leaf under the petals of the blue flower. Angle it straight up covering the base of the last leaf sewn on.
Attach tassel to the dreamcatcher on about 1” from the fringe edge on the right side.
Tip: If the fringe on the dream catcher is not straight it may help to steam it while it is hanging.
I hope you enjoyed this crochet Dream Catcher tutorial. Make Subscribe by email {in upper right column on blog} so you don’t miss future tutorials or pattern releases. Then come join my SP3 Crochet & Conversations group on facebook, we will be started a CAL soon teaching you Tapestry Crochet, I hope to see you in there.
~Christine
Thank you so much for the beautiful dreamcatcher pattern….I hope to one day be able to make several of these….I am looking forward to seeing many more wonderful patterns through your emails!!
Thank you Christine for sharing the Most Beautiful Dream catcher pattern I have ever seen yet it’s so very Beautiful.
Your Daughter is very lucky to have such a talented, great Mom.
I really appreciate your talent, your sharing the pattern and I will try it as soon as I finish my current project.
Thank You So Very Much.
Crochetingly Yours,
Rose Marie
This it such a great tutorial! I can’t believe it’s also a free pattern. Thank you for sharing x
Pingback: Everyday Spirit Wall Hanging Crochet Pattern & Tutorial ~ Sweet Potato 3