
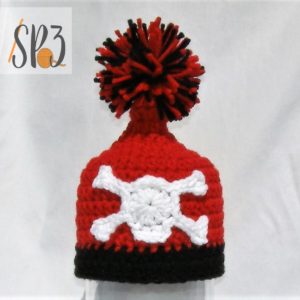
When I started my blog back in 2010, I posted a simple Skull & Crossbones applique pattern. A few years ago I switched to a new web host and somehow that pattern vanished. I received multiple messages asking for the tutorial, but I was having a difficult time locating it. However, I did find some notes scribbled down about how I made this little applique, so I am going to share them again before these notes disappear too!
Skull & Crossbones Applique


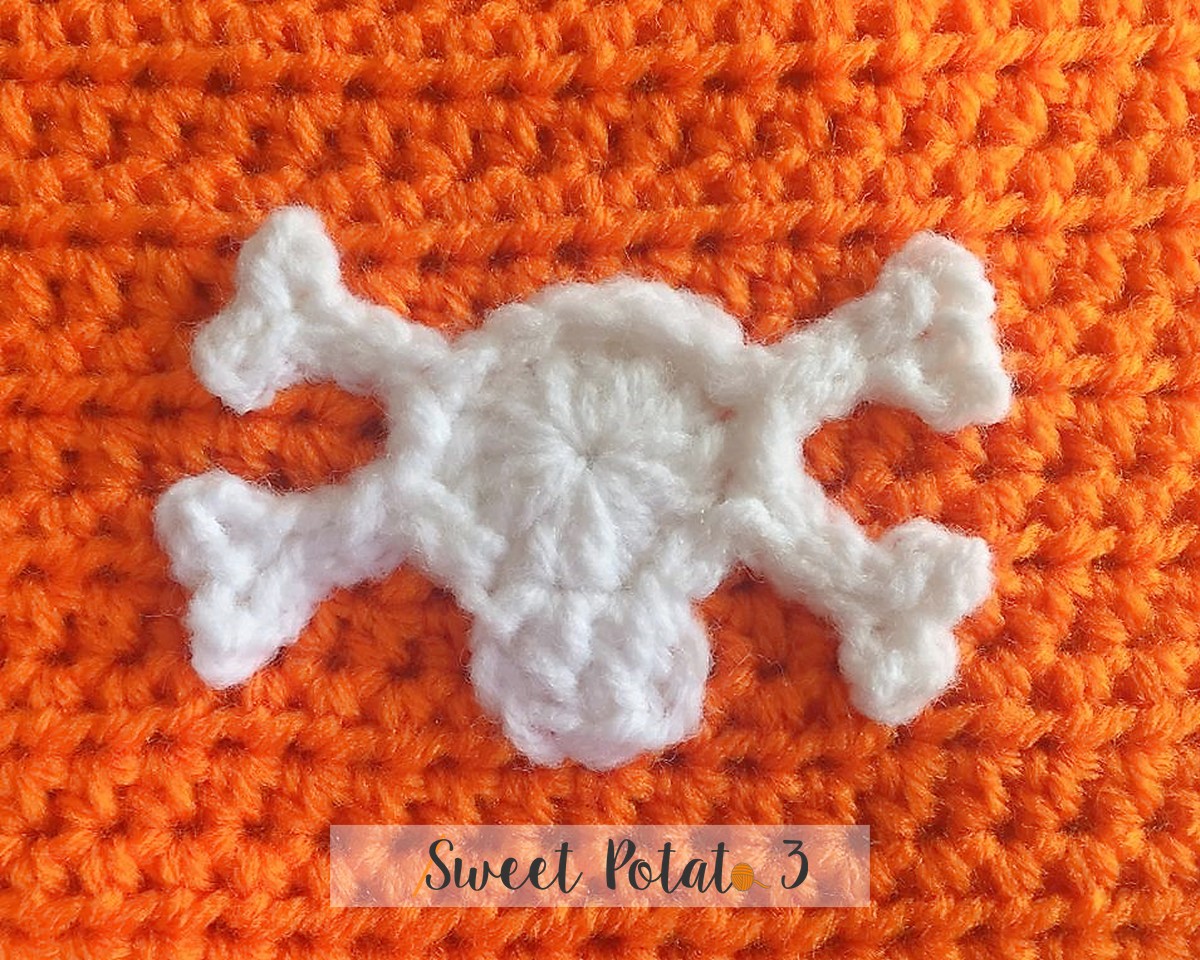
The Skull and Crossbones applique can be made in any yarn weight. The yarn you use will coordinate with how big your applique is. Use one size smaller than the hook size recommended on the yarn label. For the orange and white sample above, I used Red Heart Comfort (#4 weight) yarn and crochet Hook H (5.0 mm).
Remember: The yarn weight and crochet hook size will affect the final size of your applique.
The Pattern
R1: Ch 3, 12 dc in 3rd ch from hook, join with a slst in top of first dc (13 stitches counting beg ch 2)
Note: pull starting strand of yarn to close the hole made by the stitches (or you can begin with a magic circle if you prefer)
Round 2:
- Ch 2, dc in same st you joined in, dc in next st, ch 2, slst in same st as last dc (this makes the lower part of the jaw), slst in next 2 sts,
- [ch 6, slst in the back bar of the 3rd ch from hook, ch 3, slst in the back bar of the 3rd ch from hook, slst in the back bar of remaining 3 chs working back down to the skull, slst in the same st you beg the crossbone in], one side of a cross bone is now completed
- slst in the next st, repeat [ ], another side of a cross bone is now completed
- slst in next 5 sts, this will bring you up and over the skull and to the location of the next cross bone,
- repeat [], other side of your first cross bone has been completed
- slst in next sts, repeat [], other side of your second cross bone has been completed,
- slst in last sts, fasten off leaving a long tail of yarn to sew applique onto desired crochet piece.
Note: You can make the cross bones longer by adjusting the length of the chain (for example: chain 8 or 10 instead of a chain 6 but make sure you still work the ends the same with the ‘chain 3, slst in the back bar of the 3rd chain’)
Sew Applique On with Invisible Stitches
Now that you have a fun applique, you need to sew it onto something. This can be applied to a hat, scarf end, pillow, bag, blanket, and so many more items. The trick is to sew the applique on invisibly so you cannot see the stitching on the back side. Follow this tutorial below, I will show you how to do just that.
More Free Halloween Crochet
I have a few fun Halloween patterns that are free on my blog, be sure to check them out below:
- Free Frankensein Hat Pattern – click HERE
- Free Candy Corn Hat Pattern – click HERE
- Free Monster Hat Pattern – click HERE
- Free Pumpkin Hat Pattern – click HERE


Thank you for sharing this pattern I made 20 for my Grandson’s birthday party and made them into brooches for the gift bags
Oh how adorable! I am so happy you found the pattern and found a fabulous purpose for it, thank you for sharing that with me. 🙂