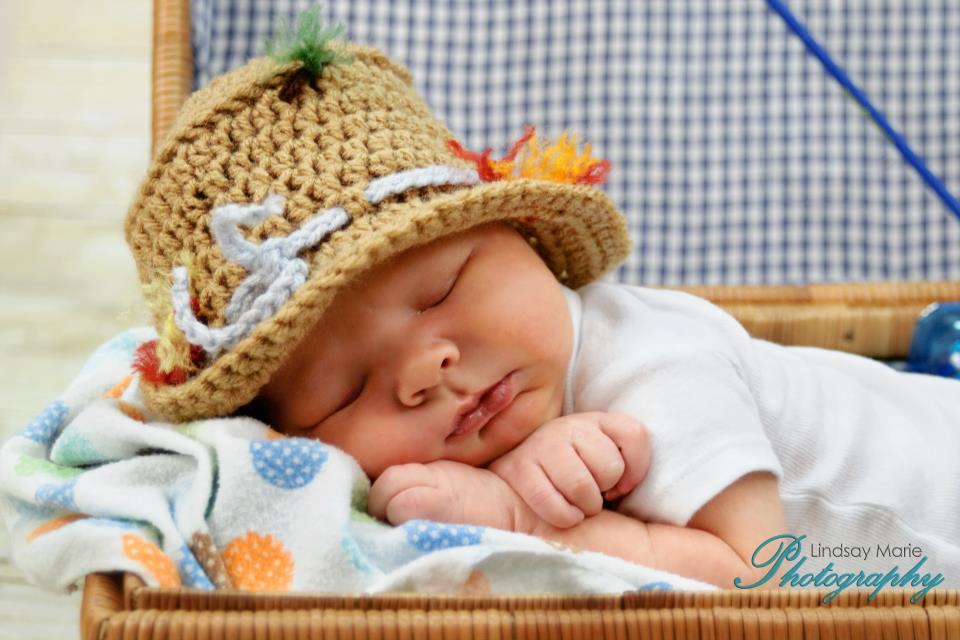
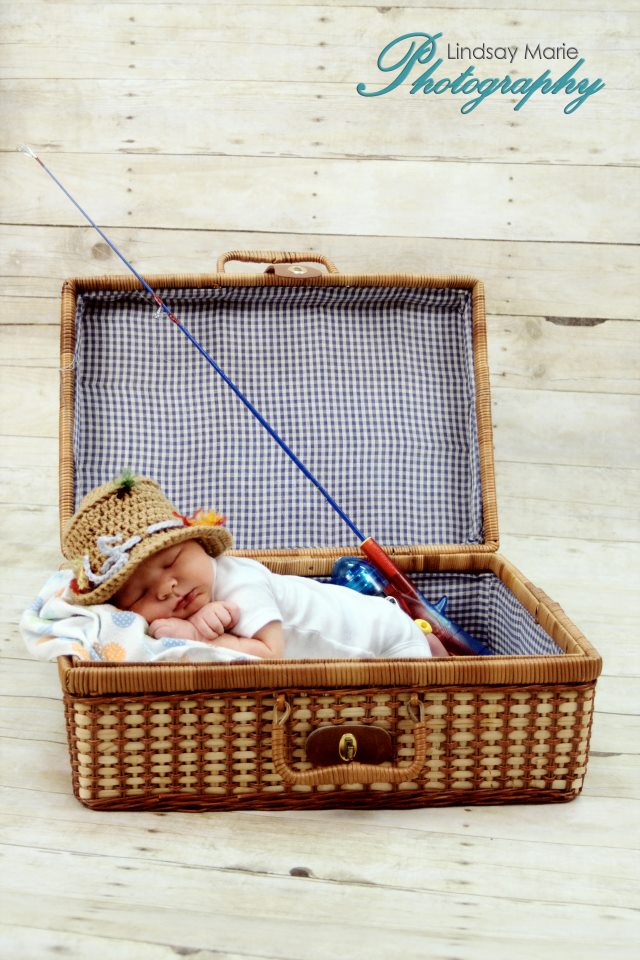
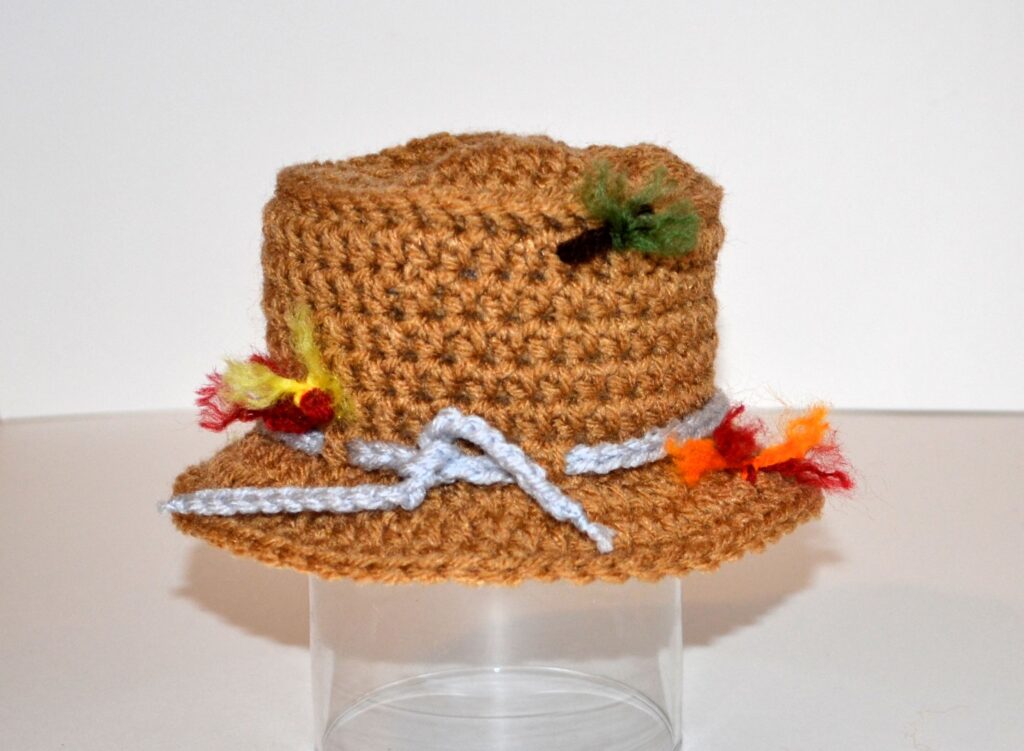
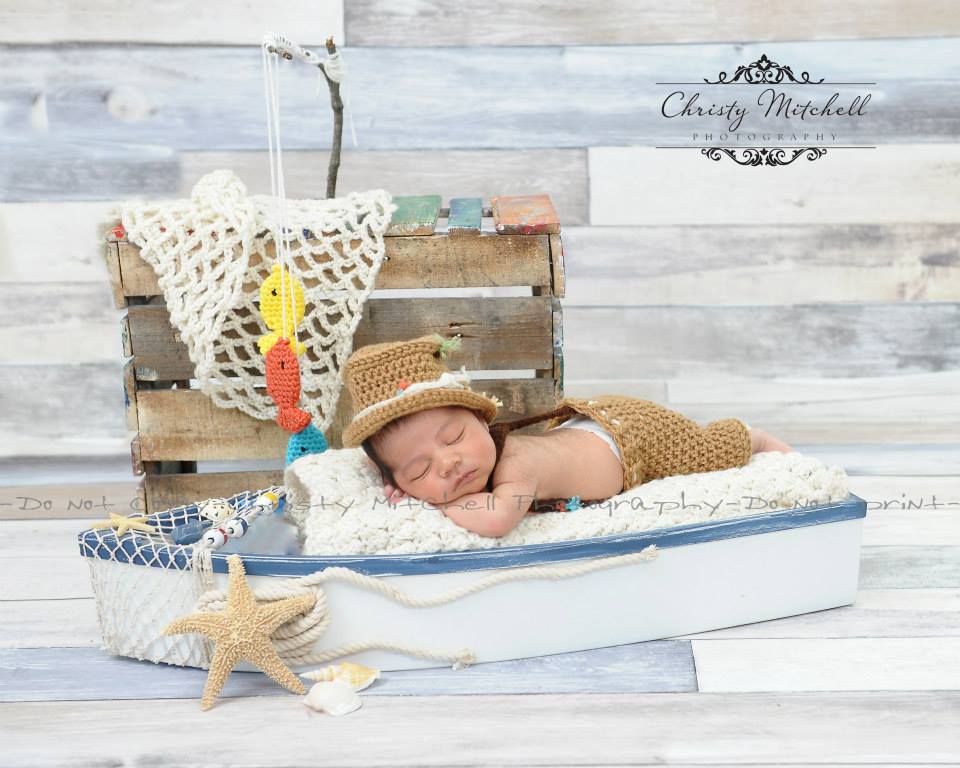
Whether your little one is headed out on an adventure or just soaking up the summer sun, this crochet fishing hat pattern for babies and children is the perfect accessory! Designed with a wide, classic brim and topped with playful, yarn-crafted fishing flies, this hat is as fun to wear as it is to make.
Inspired by the timeless outdoorsman look, the crochet fishing hat offers just the right mix of function and charm. Whether you’re crafting for a family camping trip, a photo shoot, or just everyday summer fun, this pattern will quickly become a favorite.

Fishing Hat Pattern Highlights:
- Designed for babies and children with adjustable sizing
- Wide, sturdy brim for sun protection
- Cute yarn “flies” for a fishing-inspired look
- Quick and easy to customize with your favorite yarn colors
Free Fishing Hat Pattern
This fishing hat pattern is an original design that I first released back in 2012 when I was just starting out—and it quickly became one of my top sellers for many years! Loved by parents and photographers alike for its charming, outdoorsy style, it’s been a fan favorite. I’m so excited to now offer this beloved pattern for free exclusively on my website as a way to celebrate where it all began and to share the joy of handmade with even more makers.

Materials Needed for Your Fishing Hat
- 50 – 150 yards of Worsted (4) weight yarn, the yardage varies depending on the size you will be making
- Crochet Hook size I (5.5 mm)
- Measuring Tape
- Yarn Needle
- Scissors
Stitches and Abbreviations Used
- St(s) = stitch(es)
- Slst = slip stitch
- Ch = chain
- Sc = single crochet
- Hdc = half double crochet
- Dc = double crochet
- 2tog = decrease a stitch by working 2 stitches together
- Join = this means to join the rounds together with a slip stitch in top of beg st
- FL = work stitch in the front loop only
- BP = work stitch around the back post of the stitch in previous row
- Beg = Beginning
- R = Round
Gauge Check for Fishing Hat
As with all crochet patterns that are made to fit, it is essential to check your gauge and adjust your hook accordingly to match it. If you do not check your gauge and adjust, your completed fishing hat may not fit correctly.
With Hook I: 13hdc & 10 rows = 4 inches square
Fishing Hat Sizes and Measurements
- Newborn (12 ¼” around – fits up to 14” circumference)
- 3 to 6 Months (14” around – fits up to 15″ or 16″ circumference)
- 6 to 12 Months (16″ around – fits up to 18″ circumference)
- 12 to 24 Months (17″ around – fits up to 19″ circumference)
- Child (18” around – fits up to 20″ circumference)
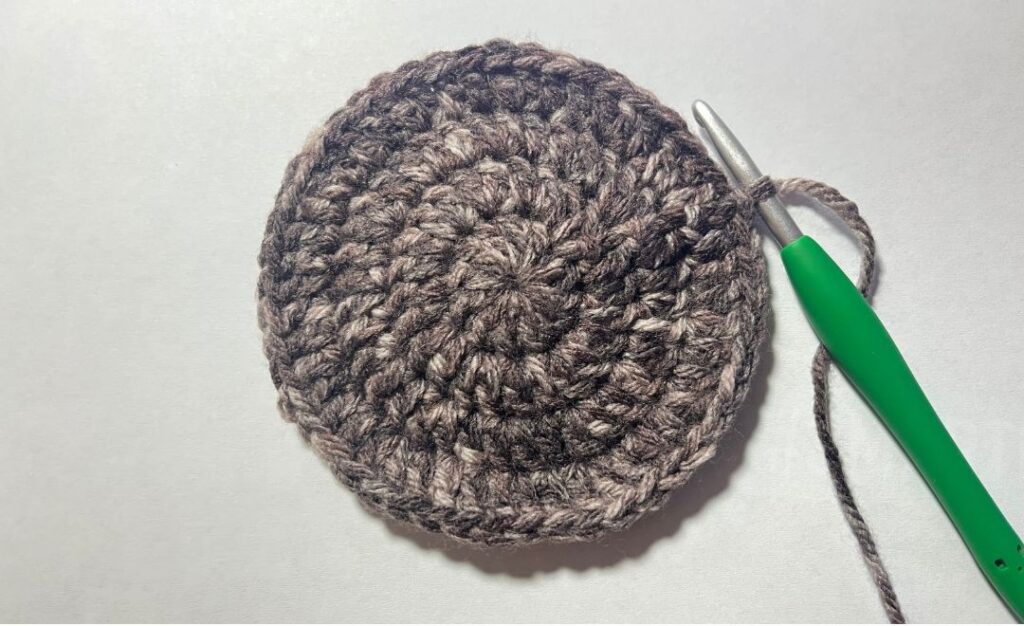
Crocheting the Top of the Fishing Hat
For all hat sizes, follow the instructions through Round 4, then continue to the size of hat you are crocheting. Do not count your beginning chain as a stitch. To join at the end of the round, work a slst in top of the rounds beginning stitch.
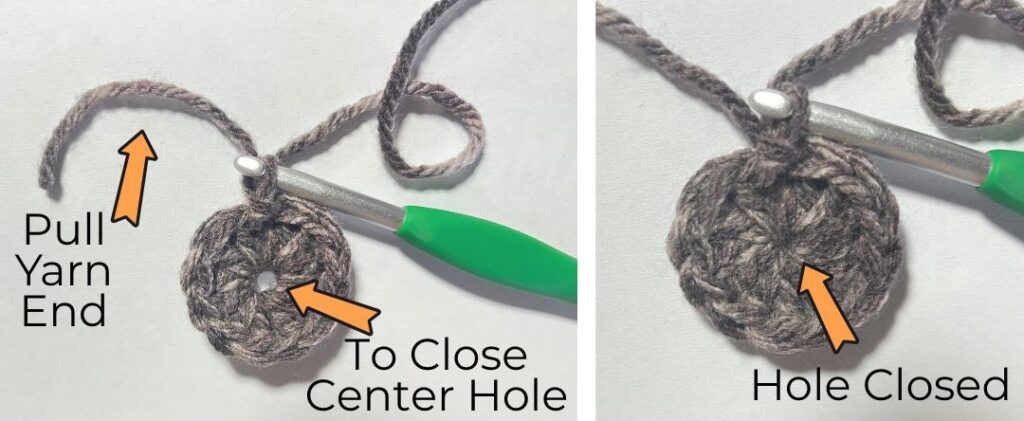
- R1: Ch 2, in 2nd ch from hook crochet 12 dc, join (12). Pull the beginning piece of string to close the opening in the center, pulling tight enough to secure the hole closed.
- R2: Ch 1, 2dc in each st around, join (24)
- R3: Ch 1, 2hdc in first st, hdc in next st, [2 hdc in next st, hdc in next st], repeat [] around, join (36)
- R4: Ch 1, 2hdc in first st, hdc in next 2 sts, [2 hdc in next st, hdc in next 2 sts], repeat [] around, join (48). Continue to appropriate size of hat you are making for the remained of the instructions.
Newborn Size:
- R5: Ch 1, sc in each st around, join (48)
- R6: Ch 1, BPsc in each st around, join (48)
- R7: Ch 1, sc in each st around, join (48). At this point in the hat, you have created a turn, and you will now begin to crochet the sides of the hat.
- R8: Ch 1, hdc in first st, hdc in next 5 st, hdc2tog, [hdc in next 6 sts, hdc2tog], repeat [] around, join (42)
- R9-R12: Ch 1, hdc in each st around, join (42)
Note: for Round 13, you will work all the stitches in the Front Loop Only (FL), which will help create the ‘fold’ in the hat so that the brim will turn out.
- R13: Ch 1, [FLhdc in next st, 2FLhdc in next st], repeat [ ] around, join (63). This row is the first row of the brim.
- R14: Ch 1, hdc in each st around, join (63)
- R15: Ch 1, sc in each st around, join, (63) fasten off and weave in ends.

3-6 Month Size:
- R5: Ch 1, sc in each st around, join (48)
- R6: Ch 1, BPsc in each st around, join (48)
- R7: Ch 1, sc in each st around, join (48). At this point in the hat, you have created a turn, and you will now begin to crochet the sides of the hat.
- R8: Ch 1, hdc in next 13 sts, hdc2tog, [hdc in next 14 sts, hdc2tog], repeat [] around, join (45)
- R9-R13: Ch 1, hdc in each st around, join (45)
Note: for Round 14, you will work all the stitches in the Front Loop Only (FL), which will help create the ‘fold’ in the hat so that the brim will turn out.
- R14: Ch 1, [FLhdc in next st, 2FLhdc in next st], repeat [] around, join (68). This row is the first row of the brim
- R15: Ch 1, hdc in each st around, join (68)
- R16: Ch 1, sc in each st around, join, (68) fasten off and weave in ends.
6-12 Month Size:
- R5: Ch 1, hdc in first st, hdc in next 7 sts, [2 hdc in next st, hdc in next 7 sts], repeat [] around, join (54)
- R6: Ch 1, sc in each st around, join (54)
- R7: Ch 1, BPsc in each st around, join (54)
- R8: Ch 1, sc in each st around, join (54). At this point in the hat, you have created a turn, and you will now begin to crochet the sides of the hat.
- R9: Ch 1, hdc in next 4 sts, hdc2tog, [hdc in next 7 sts, hdc2tog], repeat [] around, join (48)
- R10-R15: Ch 1, hdc in each st around, join (48)
Note: for Round 16, you will work all the stitches in the Front Loop Only (FL), which will help create the ‘fold’ in the hat so that the brim will turn out.
- R16: Ch 1, [FLhdc in next st, 2FLhdc in next st], repeat [] around, join (72). This row is the first row of the brim.
- R17: Ch 1, hdc in each st around, join (72)
- R18: Ch 1, hdc in each st around, join (72)
- R19: Ch 1, sc in each st around, join (72) fasten off and weave in ends.
12-24 Month Size:
- R5: Ch 1, hdc in first st, hdc in next 3 sts, [2 hdc in next st, hdc in next 3 sts], repeat [] around, join (60)
- R6: Ch 1, sc in each st around, join (60)
- R7: Ch 1, BPsc in each st around, join (60)
- R8: Ch 1, sc in each st around, join (60). At this point in the hat, you have created a turn, and you will now begin to crochet the sides of the hat.
- R9: Ch 1, hdc in next 4 sts, hdc2tog, [hdc in next 7 sts, hdc2tog], repeat [] around, join (52)
- R10-R16: Ch 1, hdc in each st around, join (52)
Note: for Round 17, you will work all the stitches in the Front Loop Only (FL), which will help create the ‘fold’ in the hat so that the brim will turn out.
- R17: Ch 1, [FLhdc in next st, 2FLhdc in next st], repeat [] around, join (78). This row is the first row of the brim.
- R18: Ch 1, hdc in each st around, join (78)
- R19: Ch 1, hdc in each st around, join, (78) fasten off and weave in ends.
Child (up to about 12 years) Size:
- R5: Ch 1, hdc in first st, hdc in next 3 sts, [2 hdc in next st, hdc in next 3 sts], repeat [] around, join (60)
- R6: Ch 1, sc in each st around, join (60)
- R7: Ch 1, BPsc in each st around, join (60)
- R8: Ch 1, sc in each st around, join (60). At this point in the hat, you have created a turn, and you will now begin to crochet the sides of the hat.
- R9: Ch 1, hdc in each st around, join (60)
- R10: Ch 1, hdc in next 13 hdc2tog, [hdc in next 13 sts, hdc2tog], repeat [] around, join (56)
- R11-R17: Ch 1, hdc in each st around, join (56)
Note: for Round 18, you will work all the stitches in the Front Loop Only (FL), which will help create the ‘fold’ in the hat so that the brim will turn out.
- R18: Ch 1, [FLhdc in next st, 2FLhdc in next st], repeat [] around, join (84). This row is the first row of the brim
- R19: Ch 1, hdc in each st around, join (84)
- R20: Ch 1, hdc in each st around, join (84), fasten off and weave in ends.
Finishing Details of the Fishing Hat
Tie for Hat Band
To create the tie around the band of the hat, pick a contrasting yarn color. You will want to crochet a length that will fit around the base of the hat and leave enough space to knot it. I chained approximately the following for each size:
- newborn & 3-6 month size – 88 chains
- 6-12 month & 12-24 month – 95 chains
- child – 110 chains
Once your chain piece has been completed, go ahead and fasten off. I tied small knots at the beginning and the end of the chain piece, this is mostly for looks. Next you will want to weave the tie through the stitches of the row above the turn of the hat band. You can just visualize about 1/4 way around and weave through the stitches. Then tie along the side and you are now ready to create a few ‘flies’ to add to your fishing hat.
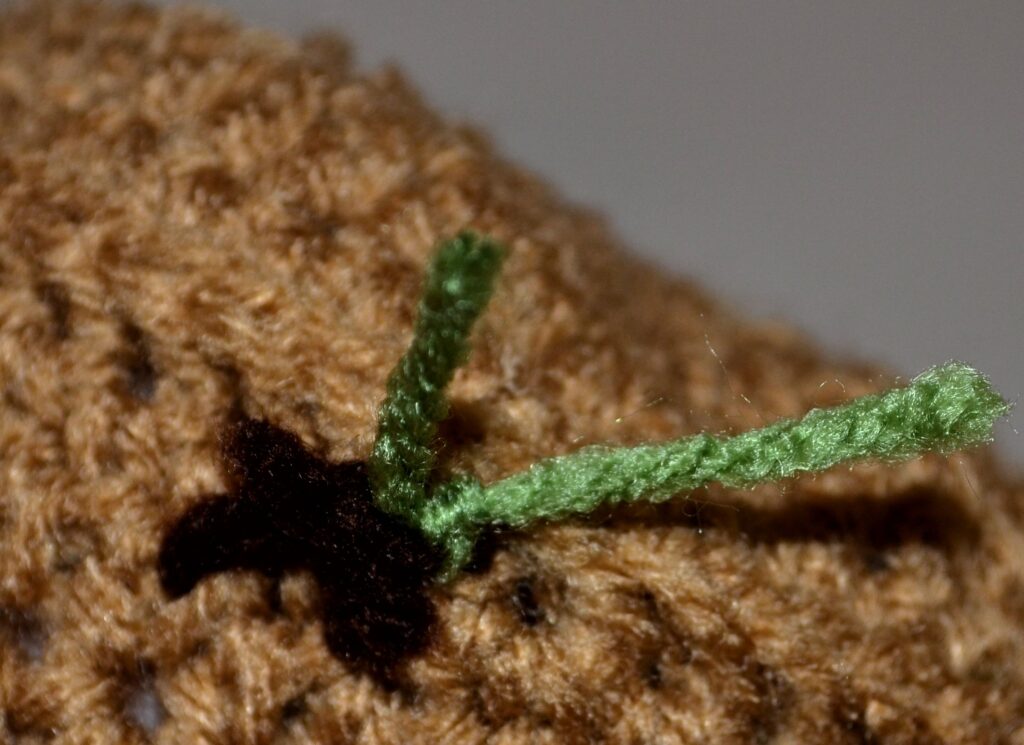
How to Make the Flies
After your fishing hat is made, it is time to add the cute touch of the yarn flies. This is a fun part where you can really make the hat custom with colors, placement and numbers of flies.
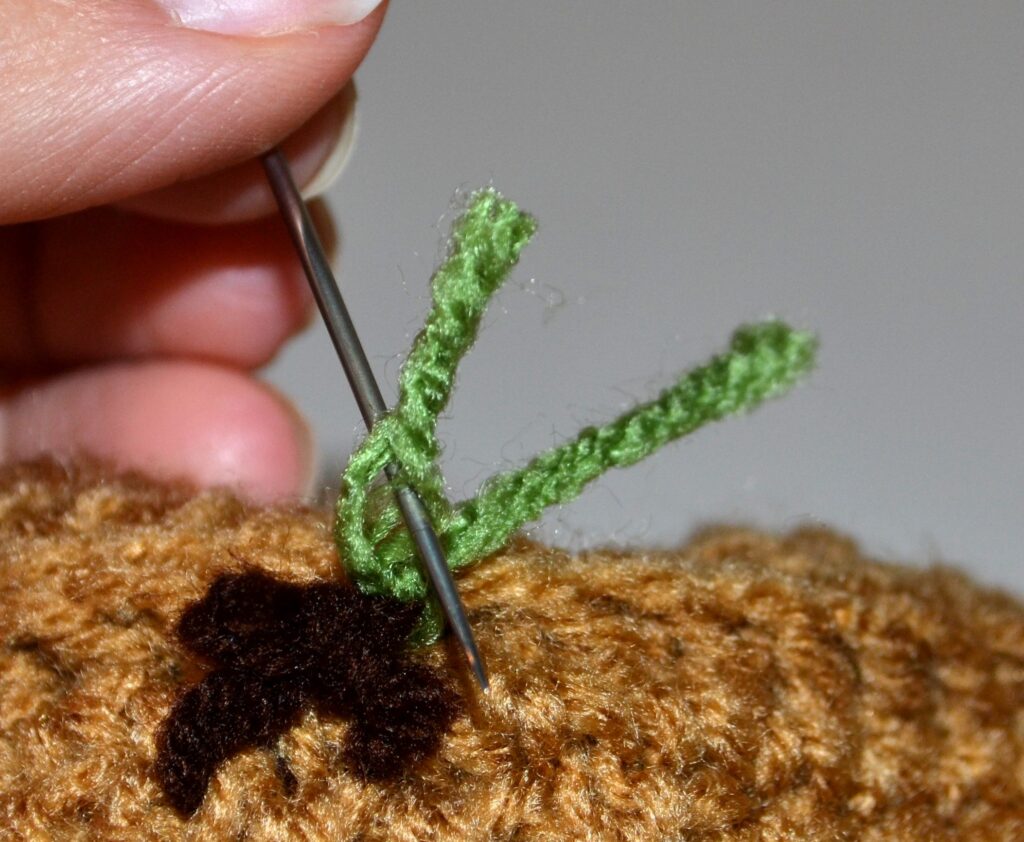
Decide where you would like the fly to be placed on your hat; it can be anywhere you envision. Thread a yarn needle and place the needle halfway through the yarn so you have equal lengths on each side (this will just double the yarn thickness; it isn’t mandatory). Using the threaded yarn needle, pull through about 3-4 stitches; this will end up being the length of the body of the fly. Making sure not to pull the stitches of the hat together, secure the yarn with a knot. At this point, you can now cut the yarn, leaving it however long you want. Longer strands can be used as “wings,” or shorter strands can leave more of a “leg” look to your fly.

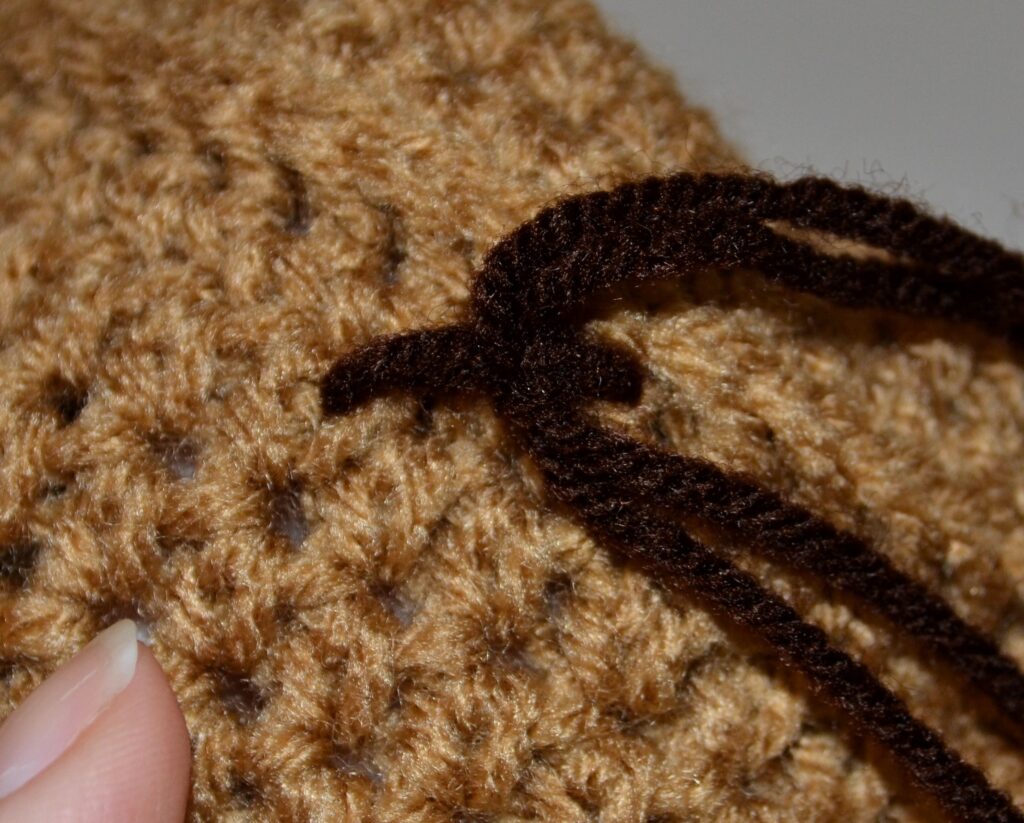
Using an alternative color of yarn, tie a knot around the fly’s body. Now, cut the yarn to your desired length. If you are not sure how long to cut the yarn, leave it longer, you can always trim it later if you want. Now, using a yarn needle or old bristle brush (like a toothbrush), comb through the fibers of the yarn to make the wings.
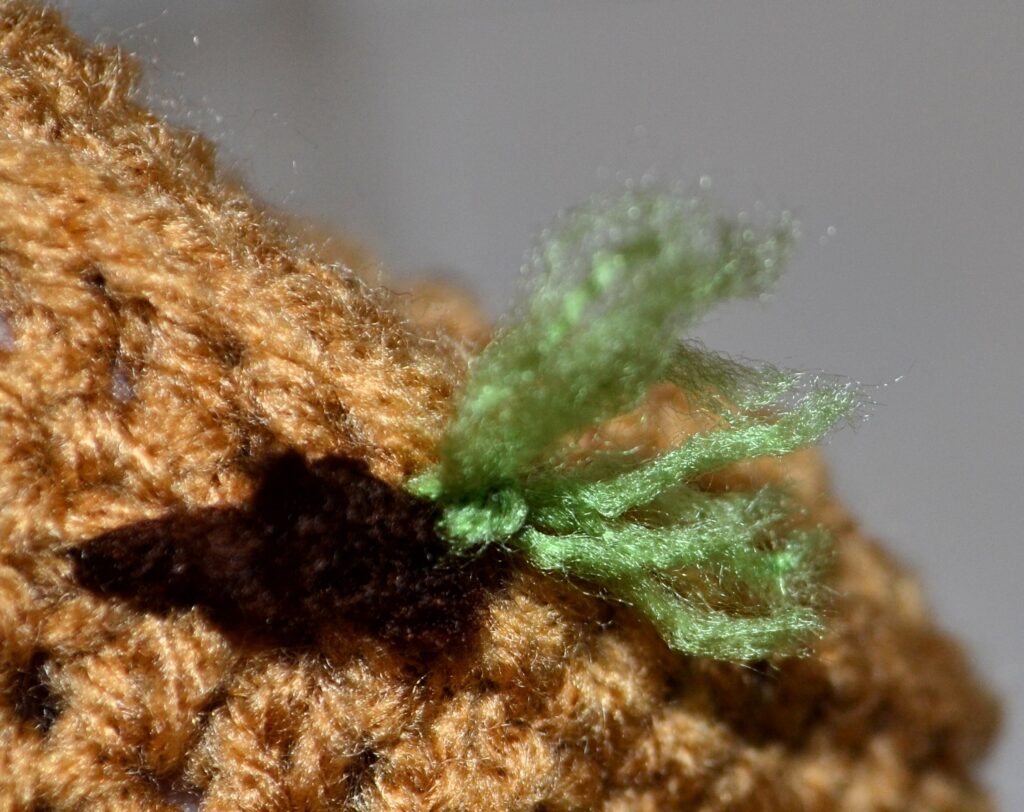
Now repeat this process anywhere else on the hat you want a fly. This is a fun part of the project where you can really make it as crazy and full of flies, or keep it simple.
Other Fishing Pattern You May Love
- Newborn Fishing Set includes suspender britches, this same hat pattern, net and fish – click HERE
- Pygmy Seahorse Amigurumi – click HERE
- Sea Turtle Baby Blanket, could make a cute shower gift with the hat – click HERE
- Fish On Throw Size Blanket – click HERE
More Crochet Fun
Follow Sweet Potato 3 on Facebook to see more pattern releases, sales, and crochet fun, just click HERE.
However, if you would enjoy a more interactive group experience, you need to join my Crochet & Conversations Facebook group, click HERE. It is a ton of fun, and I encourage everyone to share their projects, WIPS (works in progress), and inspirations. Plus, you get exclusive deals, are the first to see new releases, give input on designs, and have opportunities to win patterns. Join now and get to know others who also enjoy the art of crochet.